Biltong box / Drying cabinet for dried meat - Building Instructions


Biltong box / Drying cabinet for dried meat - Building Instructions
Building instructions for a Biltong box (drying cabinet) for making original South African Biltong (dried meat)
If you have had the pleasure of trying Biltong (dried meat) on a journey through South Africa or Namibia, you will know just how tasty this delicacy is. Biltong is traditionally made from lean beef or game meat (Kudu, Springbok). Then only salt, spices and vinegar are used - no preservatives. The word Biltong comes from the Dutch Bil (=buttock of an animal) and Tong (=tongue). In South Africa and Namibia, Biltong is hung outside to dry. Since we do not have such a dry climate in Europe, we do not recommend this drying method. However, with few tools you can build your own Biltong box (drying cabinet) and make your own Biltong within a few days. Here is the link to the recipe:
Recipe for original South African Biltong (dried meat), dried in your own homemade Biltong box
What is required ?
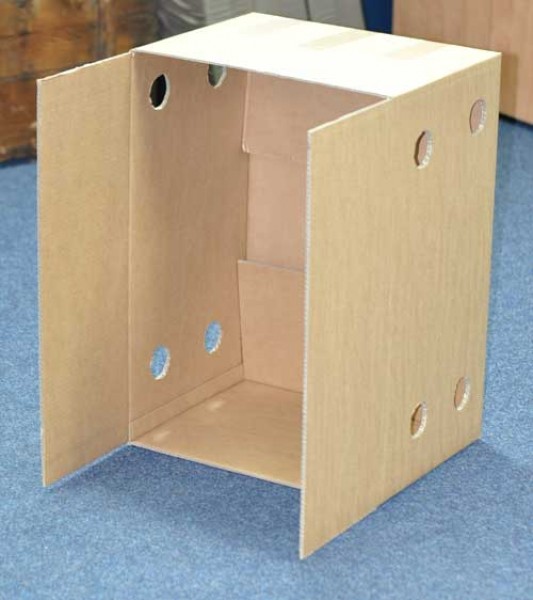
- A large and very sturdy cardboard box (approx. 70cm x 45cm x 35cm)
- A 60 Watt lightbulb with socket and cable
- Rods for hanging the meat
- Aluminium foil
- Sausage string
Comment: If you initially just want to test the functionality of a Biltong box, the cardboard box variant is ideal. A wooden version would be more expensive, albeit sturdier. In the future we will also publish introductions for making your own wooden Biltong box.
Step 1: Seal the cardboard box on one side with adhesive tape and cut off the two tabs on the shorter side with a carpet knife. Put aside one tab, as this will still be needed. Cut air holes of approx. 5 cm in diameter in the top and bottom of the box. Here it’s all about function, not beauty.
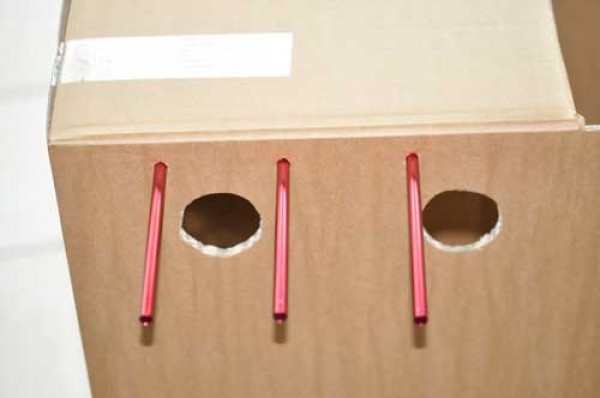
Step 2: Approximately 3cm below the upper lid, rods should be pushed through both sides. We used the segments from an old aluminium tent pole. Any material is fine as long as it is sturdy enough.
Step 3: Connect the bulb socket to the power cable.
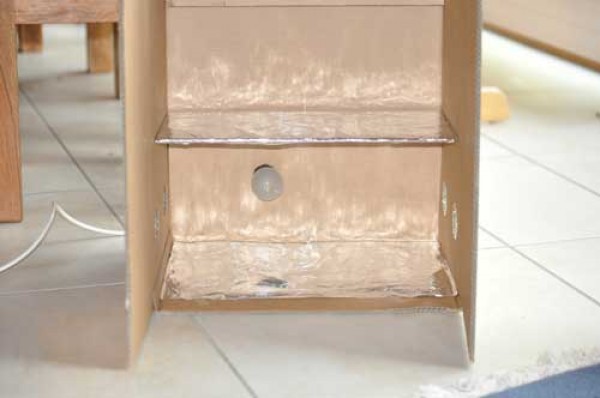
Step 4: On the back wall, approx. 10cm above the base, cut a hole in the box for the lightbulb.
Step 5: Line the bottom of the box with aluminium foil, so that dripping meat juices (only at the beginning) do not soften the box. Wrap one of the side flaps that you cut off at the beginning in aluminium foil and place this about 15cm above the bulb. Put 2 nails in the box 3cm from each side, so that the box is stable and secure and the meat juices cannot drip onto the lamp. You should cut air holes in this protective layer, so that the warm air can circulate better. Alternatively, you can simply attach a small drip protection for the lamp.
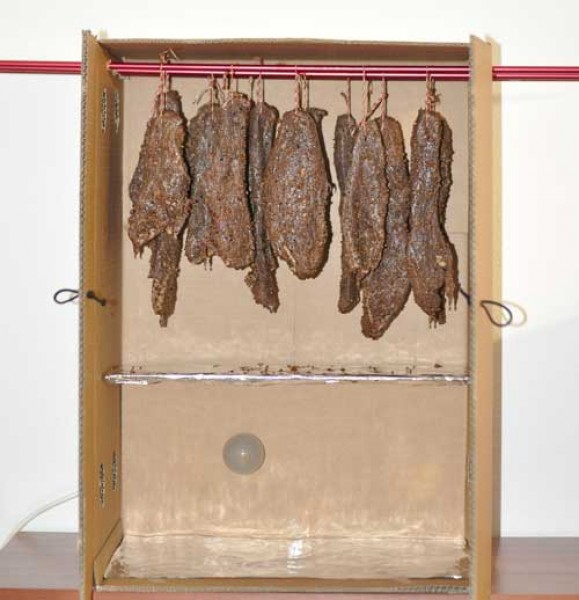
Step 6: The large side flaps can be closed like cabinet doors with the help of an elastic band and a hook.
Now you have a Biltong box for 3kg of meat ! After 3-4 days your Biltong will be ready.
Making your own Biltong box using a cardboard box is quick and easy - and works very well.
Manufacturer
Name: | Rezepte |
Address: |
Zum Testen (fast) ideal
Die Biltongbox erfüllt ihren Zweck: Sie macht Biltong.
Die hier vorgestellte Variante aus Karton hält zwar nicht lange, ist jedoch ideal, um hauseigenes Biltong zu machen, wenn man noch keine Erfahrung hat, da man sich Mühe und Kosten spart.
Eine Holzbox ist natürlich empfehlenswerter, gerade für die häufigere Herstellung von Biltong.
Einziges Manko: Es sollte darauf hingewiesen werden, dass das Fleisch nicht vor Fliegen und anderen Kleintieren / Insekten geschützt ist. Sinnvoll wäre es, ein feinmaschiges Draht- oder Fliegengitter an den Lüftungsöffnungen anzubringen, um das Legen von Insekteneiern im Fleisch (oder anderweitiger Kontamination) zu verhindern.


